|
|
August 2001 - August 2002.
The Minicam is a low-cost, easy to build, video camera with an
integrated transmitter that can be mounted on any model airplane.
- It can be built for less than 90 US$/Euros.
- It weighs about 50 grams and can be mounted on small
electric-powered radio-controlled airplanes.
The Minicam is nothing more than a modified Xcam-2 from
x10.com (you know, the people
who keep popping up browser windows with flashy advertizing).
As much as I dislike their marketing tactics, they do produce
fun techno toys at incredibly low prices. One of them is the
80 US$/Euros XCam-2. It includes a low-cost CCD video camera
a 2.4GHz video transmitter and a pad antenna. It also includes
a video receiver with video/audio output (for a monitor, VCR,
or camcorder), as well as a battery-based power supply (you
will need that). Although our European friends may be able to
order the camera from the US, they must be aware of the fact
that the receiver produces NTSC signals (see
below for how to solve that problem)
Building the minicam
|
The idea is to take apart the plastic casings and extract the
electronics (to save weight). To do this, pry open the camera
casing, and the base (where the trasmitter is located).
Then, cut the cable that connects the camera module to the transmitter,
and slide it out of the casing. The cable must now be soldered back.
This presents no difficulty since the wires are color coded.
The battery power supply casing must now be taken apart to extract
the 6v to 18v DC-DC voltage converter. Using this converter will
let you power the camera with a regular 4 cell battery pack, rather
than with two 9v batteries in series. The converter output must be
soldered to the power supply input of the transmitter.
|
|
Mounting the minicam, Version 1.0: fixed mount
|
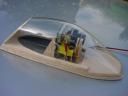
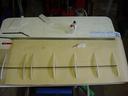
Once the electronics has been extracted, a simple "cockpit" can be
built to house it. An example is shown here. This uses a standard
"P-51"-type cockpit that has been truncated in the back to save space.
The power supply is mounted underneath the camera module, and the
transmitter is mounted vertically behind the camera module.
|
|
|
|
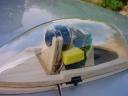
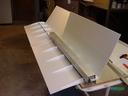
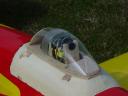
The camera is held by the objective with a rubber band,
The rest is held in place with the yellow foam pad.
In the final version of the cockpit, black cardboard
was added all around the front of the camera (outside
the filed of view) to avoid glare and sun reflections.
|
|
|
Mounting the minicam Version 2.0: steerable mount
|
Experiments with the fixed mount showed that steering the plane towards
interesting places was quite difficult. A steerable camera controled
by a spearate operator with a second radio might help keep interesting
subjects within the filed of view. We set out to build a steerable camera
module and a specialy designed plane to put it in: Ze Big Brozer.
|
|
|
|
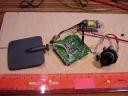
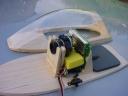
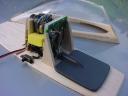
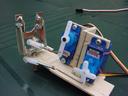
The steerable camera mount is built with pieces of epoxy printed circuit
boards soldered together. A plywood assembly holds the camera mount
and two Hitec HS-55 submicro servos (that are cheap and lightweight).
In its rest position, the camera points 20 degrees down.
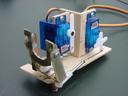
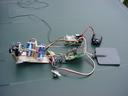
This shows the complete assembly. As it turns out, the tiny 150mAh
NiMh battery shown on the pictures was not powerful enough to power
the video transmitter and the servos at the same time. It was replaced
with a standard 600mAh NiCad receiver pack (but I guess a 300mAh
NiMh pack would do fine).
|
|
|
|
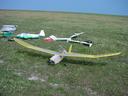
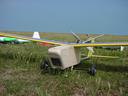
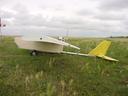
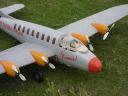
This shows Jean-Claude Le Cun's "Ze Big Brozer" with the steerable
minicam v2.0 mounted in the nose.
|
|
|
|
As it turns out, the 2 meter aileron-less wing recycled from a "Spirit"
glider was inapropriate: The combination of double dihedral, absence of
ailerons, and low center of gravity caused wild oscillations in the roll axis.
The wing was replaced with a 1.5 meter high-lift wing with ailerons, no
dihedral, and a 30 cm chord undercambered airfoil. It is built with a sheet
of 3mm depron folded over a few ribs. The spar is a 6mm carbon tube
(just like the "Horreur"). It has the same surfce area as the Spirit
wing, but weighs almost half as much (210g vs 380g).
|
|
|
|
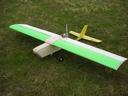
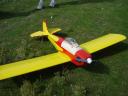
This shows Ze Big Brozer v2.0 with its new wing.
As it turns out the tail proved too short (or the
vertical fin too small) for the size of the wing.
The plane suffered from a large inverse yaw effect.
|
|
|
Aerial Movies taken with the minicam
Summer 2002 Campaign: Steerable Camera
Summer 2001 Campaign
| First test August 5, 2001: on Jean-Claude Le Cun's Space Walker |
|
This shows the minicam assembly placed in lieu of the cockpit
on top of a foan base.
|
|
|
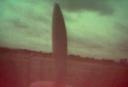
| Videos taken from the Space Walker. The streaks on some parts of
the video are caused by the propeller. This made us realize that you
need a multi-engine plane or a "pusher" prop. |
Low Quality RealVideo (640KB)
High Quality MPEG1 (33MB)
|
| OK, we had two problems: the prop is in the way, and there is an
awful lot of sun glare. |
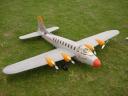
| Second test, August 5 2001: on Bruno Blin's 4-engine "Loana" (Multiplex Cargo) |
|
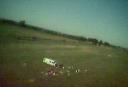
Here is "Loana", proud member of the Banana Republic Airways fleet (also known
as "Wonder BRA"). The minicam is crudely attached with Blenderm in lieu
of the cockpit.
|
|
|
|
A close up of Loana's private parts, ready to go aloft,
despite the fact that I don't like aloft stories (for our
non-French friends: this is an inside joke that has to do
with a particularly crude reality TV show).
|
|
|
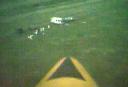
| Video taken from Loana. No more prop streaks,
but still a redish glare |

Low Quality RealVideo (1.5MB)
High Quality MPEG1 (76MB)
|
| Third test, August 12 2001: Multiplex Twinstar, and Fast Delta |
| Video taken from a Multiplex Twinstar. No more glare:
black cardboard was added around the front of the camera.
|
Low Quality RealVideo (1.7MB)
High Quality MPEG1 (88MB) |
| Video taken from a fast Delta with a thermal engine.
Hold on to your hats, and watch out for those high-speed low-altitude
dives toward the crowd! This video is more heavily edited than the other
ones because with the speed of the airplane, the camera was quickly
out of range.
|
Low Quality RealVideo (960KB)
High Quality MPEG1 (39MB)
|
Range
The transmitter/receiver pair is advertized as having a range of 30
meters, but in practice, the range is much larger when transmitting
from the air to the ground (something about the radiation power
decreasing like the square of the distance in free space instead of
with the cube of the distance at ground level). In any case, the range
seems to be around 100m, which is fine when transmitting from a
relatively slow airplane. The main problem is that the pad antennae
are somewhat directional. Improving the range should be possible by
making the transmitter antenna less directional (a simple wire) and
possibly putting a reflector behind the receiver antenna (and aiming
it at the plane).
Recording the output of the Minicam receiver
To record minicam videos, I plug the minicam receiver composite
video output into the composite video input of my Canon ZR20
miniDV camcorder. I then transfer the video digitally to a computer
through the camera's Firewire port.
If you live outside the US, you may be able to order the Xcam
from X10.com, but you may have a problem because the composite video
output of the receiver spits out NTSC (the US color TV standard).
Recording that signal can be done in one of three ways:
- using an NTSC camcorder (one that has an analog composite video input,
such as the Canon miniDV "Z" series (Z10, Z20, Z30....).
This is a perfect solution if you live in America or Japan,
but not if you live in a non-NTSC country.
- using an NTSC or multistandard VCR, but you must have a way of
powering it from your car battery.
- If you have a laptop computer, the simplest solution is probably
to buy a video grabbing device (with analog composite video input
and USB or Firewire output) and plug into your laptop. Dazzle,
Hauppauge, and Pinnacle sell those widget in the US and Europe
for less than 100 US$/Euros. Most of these can accept
NTSC and PAL because they are built around multi-standard chipsets
(but check the manual in advance to make sure).
|


 .
.